This page has frequently asked questions / problems and their associated solutions. To view the solution to one of the entries click on its title to expand the answer / solution.
Note: New students arriving for the 2017/8 academic year can skip to Step 3, however you'll need to allow up to 3 hours after creating your UIS Password in order for it to sync with the Microsoft servers before you can log in to your University of Cambridge Microsoft account.
|
|
Check you qualify for a University of Cambridge Microsoft account > |
|
|
Your UIS Password has to be synced to Microsoft's authentication server before you can log in. Check your UIS Password has been synced to the Microsoft server > |
|
|
Log in to your University of Cambridge Microsoft account using your CRSid@cam.ac.uk email address and UIS Password: Log in here: https://portal.office365.com >
|


If you haven't got a UIS Password...
If you have a password for Raven, you can use the UIS Password Management application to create a UIS Password. Follow the process for 'Changing your password' (see video link below).
You may need to allow up to 3 hours for your new UIS Password to be synced to Microsoft's authentication server before you can log in to your University of Cambridge Microsoft account.
As a local administrator right-click on the cmd.exe icon and select Run As Administrator. The command shell will have Administrator: Command Prompt rather than just Command Prompt in the top left of the window.
Office 2010:
At the command prompt type:
cd "C:\Program Files\Microsoft Office\Office14"
OR
cd "C:\Program Files (x86)\Microsoft Office\Office14"
Office 2013:
cd "C:\Program Files\Microsoft Office\Office15"
OR
cd "C:\Program Files (x86)\Microsoft Office\Office15"
To set the KMS activation server enter:
cscript ospp.vbs /sethst:kms.csx.private.cam.ac.uk
Once the KMS server has been set you can activate Office by entering:
cscript ospp.vbs /act
Activation can also be checked in any program in Office by clicking on the File tab and selecting Help in Office 2010 orAccount in Office 2013
Office 2016
For 32-bit versions of Office on 32-bit versions of Windows or 64-bit versions of Office 2016 on 64-bit versions of Windows the script is normally located in the following folder:
- C:\Program Files\Microsoft Office\Office16
To change to the folder type the following in an administrative command prompt window:
cd "C:\Program Files\Microsoft Office\Office16"
If you are installing the 32-bit version of Office on 64-bit versions of Windows the script is normally located in the following folder:
- C:\Program Files (x86)\Microsoft Office\Office16
To change to the folder type the following in an administrative command prompt window:
cd "C:\Program Files (x86)\Microsoft Office\Office16"
NOTE: The quotes are needed to cope with empty spaces in the folder names.
After activation Windows will attempt to renew activation every 7 days on a sliding 180 day grace period. After renewal the slider starts the 180 day grace period again.
For more details information:
http://www.ucs.cam.ac.uk/support/windows-support/winsuptech/volact/officeva
First:
- You must be connected to the network fully (e.g. using the University Wireless Service (previously known as Lapwing), or an office, College or home connection).
- Make sure that you have your credentials (eduroam identifier and Network access token (username and password)) from the UCS Tokens service: https://tokens.uis.cam.ac.uk
Download the tool:
- Windows 10
- MacOS
- Ubuntu 18.04 LTS "Bionic Beaver" (openSuSE is similar)
The eduroam CAT sets the configuration automatically to leave it in the state it would be in if you had gone through the steps manually. It does not leave anything else (e.g. utility, autoupdating application) on your system.
More details information can be found here:http://www.ucs.cam.ac.uk/wireless/eduroam/localusers
What do I do if I have lost all my network configuration?...
If you're unsure how your computer is configured, or don’t know your IP address that you need to make configuration changes, follow the directions below.
- Go to the Start menu, select All Programs, then Accessories, then Communications, then Network Connections.
- Right-click on the Local Area Connection icon and select Properties.
- Click the Internet Protocol (TCP/IP) listing, then Properties
- Make sure that the TCP/IP settings are set to Obtain an IP address automatically DHCP and Obtain DNS server address automatically. Click OK.
How do I Set Up Dynamic Ethernet (DHCP) for Windows?...
- On your desktop, right-click My Network Places, then select Properties.
Note: If you are running Windows XP and do not see My Network Places on your desktop, you need to make the icon visible. See Making My Network Places appear on your Desktop for instructions.
- Right-click Local Area Connection, then select Properties.
- Windows Local Area Connection Properties will appear - General Tab
- Select Internet Protocol (TCP/IP), then click Properties.
- Windows DHCP Internet Protocol (TCP/IP) Properties will appear
A. Click the Obtain an IP address automatically radio button.
B. Click the Obtain DNS server address automatically radio button.
- Click OK to close the Internet Protocol (TCP/IP) Properties window.
- Click OK to close the Local Area Connection Properties window.
How do I Make My Network Places appear on my Desktop?...
If you do not see My Network Places on your desktop, here are the instructions to make this icon appear:
- Right-click on your desktop and select Properties. Windows XP Display Properties will appear
- Select the Desktop tab, then click the Customize Desktop… button. Windows Desktop Items will appear - General Tab
- Check the My Network Places checkbox, then click OK.
- Click OK to close the Display Properties window.
How do I Set Up Dynamic Ethernet (DHCP) for Macintosh?...
- Select Apple -> System Preferences.
- Click Network. A window similar to the following will appear:
Macintosh System Preferences Network Pane - Select Phar Dynamic Ethernet from the Location: drop-down list. If this configuration is not listed, you need to create one:
- Select New Location… from the Location: drop-down list.
Macintosh New Location Ethernet DHCP will appear - Type Phar Dynamic Ethernet into the Name your new location: field.
- Click OK.
- Select Phar Dynamic Ethernet from the Location: drop-down list.
Macintosh Phar Dynamic Ethernet Settings TCP/IP Tab will appear
- Select New Location… from the Location: drop-down list.
- Select Built-in Ethernet from the Show: drop-down list.
- Select the TCP/IP tab.
- Select Using DHCP from the Configure IPv4: drop-down list.
- Click Apply Now.
- Select System Preferences -> Quit System Preferences.
What are the rules regarding printing?...
To make printing work as smoothly as possible, it has been necessary to set up and adhere to certain basic rules. These rules are not made to annoy users, but they are needed to fulfil the needs of as many users as possible. Thus it is required for each user to make some compromises for the greater good. It should also be noted, that to be able to print without charge is a significant benefit for the users of this Department.
Besides of the printing quota, it is recommended to print sparingly. While printing in the Department you are expected to be aware of following principles:
- Do not print anything that is not necessary. It is not worthwhile to print a new version of your document for each correction that you have made.
- Printing should be in two-sided by default, print one-sided only if you must.
- Using printers to print multiple copies of your documents is forbidden. You should use the copying machines at level 3.
- During rush hours (from Monday to Friday) it is not recommended to print more than 50 pages at a time. When there is need to print large documents, print them in smaller sections. This applies to essays, theses and to internet/PDF documents as well. Long printing jobs will slow down the printing queue and other users will have to wait unnecessarily for your printing job to get completed. It is recommended to print large documents during weekends or night time.
- Any printing not associated with university studies or projects is forbidden, especially printing related to personal, charitable or commercial purposes. It is NOT allowed to print your family album by using the Department colour printer.
- Please think before you print, collect all of your printouts and DO NOT print pdf files direct from the web browser (save to your local machine then print).
- Acetates - Please exercise caution when using acetates in the departmental printers. Acetates can easily melt in the fuser unit of the printers, if this happens a new fuser unit is required normally costing over £150.
- Please look after the printers and try to keep the printer areas free from clutter. If the printer jams while you are using it please try to clear it if possible. If not please contact IT support for assistance.
Completely Removing the DS-Print Service
During troubleshooting, it may be necessary to remove the DS-Print Service from the workstation. Removal is achieved in four steps.
1. Remove Credentials
Open 'Credential Manager' found in 'Control Panel -> User Accounts', select 'Windows Credentials' then remove the credential named 'print.ds.cam.ac.uk'.
2. Uninstall PaperCut MF Client
Open 'Programs and Features' found in 'Control Panel -> Programs', select 'PaperCut MF Client' then select 'Uninstall'.
3. Remove Printers
Open 'Devices and Printers' found in 'Control Panel -> Hardware and Sound', select the printer to remove then select 'Remove device'.
4. Remove Print Client user identifier
Using 'File Explorer' enter '%userprofile%' in the address bar. This will open the user's home directory. Locate and delete 'pc-client.PROPERTIES' file.
ow to change your local & Phar password?...
If you want to change your password you could use the change password function within the windows security menu:
- Press (Alt+Ctrl+Del) keys
- Select Change password
- On "log on to" select this computer or phar domain
- Type your old password, then your new password & confirm it
- Press OK and then Cancel on the Windows Security
How to apply for a new user account?...
In order to be able to make the most of the IT services provided by the Department you need to have a user account. There are various types of user accounts available for you by the University of Cambridge Computing Services such as email and Jackdaw account.
In order to get a user account you have to apply for it. The application form is available at this web pages where you will find further instructions.
Applications forms are also available at our secretary office level 4 (434) and at the IT Systems Administrator office level 3 (320).
You need a password for every user account. When you are granted a user account, you will also receive a temporary password. The very first time you log in you have to immediately change the temporary password to a new that only you know. The password is secret and personal and you must give it to no one, not even to the Computer staff.
The user account is usually valid for the duration of your academic year/s (1 year for Part ii & 3 years for PhD students). Visitors who are registered as attending the University can have a user account by filling in a specific form. The password also expires and it has to be changed at least once a year.
If you have problems related to your user account or password, you can get help by turning to our offices: (level 3 (320) level 4 (406)) or by sending an e-mail to ithelpdesk@phar.cam.ac.uk
In order to guarantee both the benefit of the users and the safe use of the IT services, there are rules that every user is expected to follow.
How to Login to the PHAR domain (Windows machines) ...
Enter your user name which will be your CRSID. You will be prompted to change your password the first time you login, retype it and click OK.
New passwords must be more than 7 characters mixed alpha-numeric capital and lowercase.
Always logout when you finish working From Start\ shut down \ Select Log off <your_username>.
AFTER 5PM PLEASE SWITCH OFF THE COMPUTER
How to choose the right PASSWORD ...
- Password must be between 12 and 31 characters in length mixed alpha-numeric capital & lowercase.
- Old passwords cannot be reused.
- Select reasonably long passwords that cannot be easily guessed.
- Passwords found in the English dictionary should not be used.
- Avoid using obvious passwords (family member, pet, car, sport, etc).
- Change your password immediately if you have reason to believe it might have been discovered.
- Report any suspected misuse to the Computer Officer.
How to Know/change my computer name ...
Each computer in the Department has a unique name and is registered with Jackdaw (University Computing Services Database) in the form of mycomputername.phar.cam.ac.uk
- Go to the Start menu and Right-click on the My Computer icon. Select Properties.
- Click the Computer Name tab.
IMPORTANT: You should NOT change the computer name to whatever you like and your machine should be part of Phar domain and NOT any workgroup. Taking the machine off the domain will most likely lock you out of the computer and any files you've saved on it. - Click the Change button.
- Your computer's "Computer name" must be unique. If another computer on the Department network has the same name, you will not be able to access network printers or shared file space.
- Under Member of, please choose Domain and enter Phar as the domain name.
- Click More and type “phar.cam.ac.uk” under Primary DNS suffix of this computer
- When finished, Click OK, Click OK, then OK again to finish.
- You will need to restart your computer for the changes to take effect.
How to get access to Electronics Journals ...
All Computers in the Department are connected to the University Library Electronic Journals database which includes ScienceDirect titles BUT you need a password if you want access resources via to ATHENS (Access Management system providing authenticated access to numerous web-based services)
ATHENS passwords are administered and issued in person from Reader Services staff at:
- University Library, Reading Room
- Scientific Periodicals Library (City Centre)
- Medical Library (Addenbrooke's Site)
- Betty and Gordon Moore Library (West Cambridge)
If you are unable to visit one of the above libraries and would like to obtain a password by post, please print out and complete an Application and Declaration Form and send it to your selected library. They are unable to issue passwords by e-mail or telephone. Personal ATHENS accounts MUST be set up from within the University network.
How to recover a deleted file ...
- If your drive is making strange noises or reports a CRC read IO error, DO NOT PROCEED. This indicates a hardware failure so your data is not going to be recoverable using "undelete" style data recovery software.
- As soon as you realize your data has been deleted, stop using the computer! The less activity the better to avoid dangerous disk-swap activity.
- Check the Recycle Bin first
- Find and download data recovery software on another computer.
- Save the recovery tool to a flash drive and run it directly from there.
- Save the extracted data back onto the flash drive for added safety.
- NTFS-reader: NTFS Boot Disk provides access to your NTFS drives in an MS-DOS environment (long filenames are supported). NTFS Reader for DOS will allow you to browse and recover all kinds of deleted files.
Although it looks rudimentary, the DOS ishness is actually a real boon since Windows isn't running and mucking up your data with disk swapping. NTFS provides good data browsing and preview functionality and runs straight from a boot disk (which you should make on another computer).http://www.ntfs.com/
- File Recovery: PC Inspector File Recovery is a data recovery program with support for FAT 12/16/32 and NTFS file systems. It recovers files with the original time and date stamp, and can optionally restore them to a network drive and can recover many files, even when a header entry is no longer available. On FAT systems, the program finds partitions automatically, even if the boot sector or FAT has been erased or damaged. PC Inspector File Recovery offers an easy to use interface that will scan your drive and automatically make files that can be recovered available from a "Deleted" folder in an Explorer Style navigation tree.
To be able to use PC Inspector File Recovery you need a working Windows System. Never install the current version on the drive from which you intend to recover data! The program must be installed and run on a second, independent drive.
- Restoration: is an easy to use and straight forward tool to undelete files that were removed from the recycle bin or directly deleted from within Windows. Upon start, you can scan for all files that may be recovered and also limit the results by entering a search term or extension.
In addition, Restoration also provides an option to wipe the found files beyond simple recovery. And as such it is not only a data-recovery tool but also a security cleanup application. You can use it to totally delete your files so that no recovery is possible.
The program is very small and completely stand-alone; it does not require installation and can also run from a Floppy disk. Restoration works with FAT and NTFS as well as digital cameras cards.
Why Do I Need to Backup My Files?...
Don't fall into the old paradigm of "it will never happen to me." While there is certainly a chance that you will never have a need for the backups you make of your files, if something does happen to your computer you will certainly be glad that you have them. And you do not have to backup your entire computer, although this is certainly something that many people do, but only the files that are of the most importance to you.
Data recovery is a very complex and time consuming and not guaranteed, every month the Pharmacology Computer Officer is dealing with a number of incidence regarding data loss which could have been prevented by the user.
Some things are easily replaced, and there is no need to backup these sorts of things, but those irreplaceable documents or files that are yours and yours alone should be saved in a place where they cannot be damaged. That way, no matter what happens to your computer, you can have security in the fact that all of your files are available in backup.
How to organise your data files ...
(Do Not save any data into the desktop)
Most of the time the files that you need to backup are your data files. If you lose the hard disk, you can install the program files and other software from the original CDs or image but your data files are the most valuable and they need to be restored from your own backups.
If you organise the data files properly, it will make the task of backing them up much easier, also it will make it a lot easier for the Computer Office to recover them in case of hard disk failure. So here are a few tips on how to organise your data files.
Ideally, all your data files should be kept under a single folder (such as "My Documents" or "Data" under Documents and Setting\yourloginname on a PC and Users\ yourloginname on a Mac) organised into sub folders by subject or type of application. This makes it easy to back up all the data with a single click or a drag.
- By subject:
C:\ Documents and Setting\yourloginname\ My Documents
C:\My Documents\Projects
C:\My Documents\Images
C:\My Documents\Reports
C:\My Documents\Grants
C:\My Documents\Memos
C:\My Documents\Personal …etc - By application:
C:\My Documents\Excel
C:\My Documents\Word
C:\My Documents\PowerPoint …
Most applications allow you to change the default data folder. Once you decide on the file organization, change your application settings to automatically save files in the appropriate folder so that you don't have to change the folders every time you save a document.
It is not a good idea to mix your program files and data files in the same folder. So avoid saving your documents into folders such as "C:\Program Files\MSOffice" or "Applications\ MSOffice".
How to change the default working folder for Microsoft Word ...
- On the Tools menu, click Options, and then click the File Locations tab.
- In the File types list, click Documents.
- Click Modify.
- To select an existing folder to display as the default working folder (working folder: The folder in which your documents appear when you open or save them. If you select another folder when opening or saving, that folder becomes the working folder. You can set the startup location of this folder in most Office applications.), locate and click the folder you want in the folder list.
To create a new folder to display as the default working folder, click Create New Folder, and then type a name for the new folder in the Name box.
How to choose the right Backup Media ...
Matching the capacity of the backup medium to the amount of data you intend to backup is very important, especially as hard disks capacities grow. The more disk or tape swaps required to perform a backup, the less likely it is that you will do it routinely. Ideally, the whole backup will fit on one DVD or disk so that you can leave it to run and do something else. You don't need to back up the whole hard disk every time, so a backup media that can hold most of it will usually suffice.
Optical Backup Media
CD-R have a capacity of about 650 MB & DVD-R about 4 GB, and despite not being reusable some people use them for backup. One big advantage is that the backups are readable by any CD/DVD-ROM drive, but even though the cost of an individual disc is low it can still become a very expensive way to do backups if you need several discs per time.
CD/DVD-RW is a good flexible, reusable, general-purpose medium that is certainly usable for backup. It has disadvantages; the capacity is only average at 650 MB/4 GB, and the CD/DVD-RW disks are essentially proprietary in that only compatible reader software can read them.
USB Keys
USB keys become more popular, the price is more and more affordable and the size is getting bigger and bigger (over 20 GB). They are compatible with all platforms and convenient to transport but they can be lost or stolen easily if you don’t look after them.
Tape as Backup Media
Backups are large, sequential writes ideally suited tape drives, and tape is making a comeback as a backup device. As hard drives keep growing tape is the only medium of a similar capacity that is growing to match them. For the drives, and per-gigabyte basis for the media, it is inexpensive. It is reasonably reliable, simple to set up, and has a lot of support for drives and software. Performance can be less than ideal, especially when random access is needed to specific files on the tape. Usually this only needs to be done when restoring data.
Using Removable Drives for Backup
External Hard Disk such as Maxtor drive or various portable hard drives, have a large enough capacity to be suitable for backups. These drives have a reasonable performance (about twice the speed of a CD/DVD drive) and good reliability.
The price per gigabyte of hard disks is compares favorably to Media and they give a very high performance, random-access capability, standard interfaces and exchangeability, and excellent reliability.
Network Backup
For networked PCs, copying data over the network from one PC to another is a viable alternative to using removable drives. By duplicating each PC's information it is possible to protect each individual PC without the expense of tape drives or removable storage. Disadvantage is that viruses can travel over a network, and if all the PCs are in one building there is no off-site storage.
Online backup
Online backup is another excellent method for the backing up of your files. This allows you to store your files online, where there are no need for disks or CD/DVDs, and you can simply download your files back onto your computer whenever you want.
Lately online storage like Box.net and Xdrive (free 5GB), DivShare, Crashplan, and Dropboks have become popular. Add hosted file service for sending large data files called YoubackItUp to this ever growing list of solutions.
Similar to YouSendIt and senduit, YouBackItUp holds your uploaded files for up to 20 days, and provides a link for downloading. This free ad supported service can be used for sending large files that they cannot receive over email. You can also use this service as a temporary backup solution if you are switching computers and have to transfer large files to different locations.
How to backup your personal files on Windows 10..
Microsoft Windows XP has some very nice and simple CD writing utilities built directly into the Explorer windows. If you have a CD writer installed in your computer system, then backing up your personal files, such as word processing documents, and images taken with your digital camera, is not only incredibly easy, but also takes both little time and effort.
The easiest backup procedure for your personal files begins with a blank CD, and takes five minutes of your time.
To begin while in Windows, you will of course need to place a blank CD-R disc in your CD writer's drive (Or a DVD disc). A few seconds later, you will be presented with a small dialog box giving you several options of what you wish to do with the blank disc.
Select the first option, "Open a writeable CD folder" and presto. You now should have a window on your desktop that is waiting to be filled with backup copies of all of your important personal files.
To make a backup of any file, simply open another Explorer window in the location of the specific file(s). An example of one such location would be; C:/Backup/Pictures/.
Once you have both folders open (the blank CD folder, and the folder containing your files) simply drag the files you wish to make a backup copy from its original folder to the blank CD folder. Now your system will reserve space on the CD for the specific file, and make a copy of the file to a temporary folder, thus leaving the original file intact and completely unchanged.
The great thing about the drag and drop interface is the fact that you can drag one, two, or hundreds of files and drop them into the CD folder at anytime. This is perfect if you have a great amount of files that you wish to make backup copies of.
Once you have completed selecting the files you wish to backup, you may want to take a few minutes and organise the CD folder's files in folders, or even rename some files. These actions can easily be completed within the CD folder's window in the same manner as they would be completed in any other Explorer folder.
The last steps are to place the files you plan to backup on the actual CD, and giving you a archive copy of your files.
Because, as of right now, your files are still in a temporary folder waiting to be written to the disc. To make sure that the CD is written correctly, it is advised that you close any other running programs on your system.
Now, you are ready to finally make a hard backup of your files. In the left hand side of the CD folder, you will find the text 'Write these files to CD', followed by 'Delete temporary files'. If you wish to begin the CD writing adventure, click the first. If you have decided that you abandon your backup project, simply click on the 'Delete temporary files' and the space on your hard drive used for the temporary files will be freed. Follow the on screen instructions in the CD Writing Wizard window, and in minutes you will have a backup copy of your personal files.
Now that you have seen how easy it is to make backup copies of your personal files, you have no excuse not to make monthly backups of your personal files. One last thing to keep in mind, however is that this method is to make backup copies of your personal files. This method should not be used to backup your system files such as Windows.
How to make a system backup in Windows ...
Unknown to many users, Windows offers a simple and easy to use program made specifically to backup your system files. The program can be found by clicking the "Start" button, and navigating through the following menu items; Programs, Accessories, and System Tools.
The program is entitled Backup, however do not let the lame title fool you, as the software is both simple to use and very powerful. It is very simple to use, because you only have to specify where you would like the backup file to be stored; there are no challenging questions asked. It is very powerful because it enables you to create a single file that is a complete backup of your entire system.
Once you open the program, you will be greeted with a window containing the backup & restore wizard. After reading the window, you may click on the next button, and you will be greeted with two options; Backup files & settings and Restore files & settings.
After you select "Backup files & settings" and click the OK button, you will be greeted with a list of items that you can backup. Because the purpose of this article is to explain to you how to backup your system files, select the option "All information on this computer" and click the next button.
How to successfully make a backup copy of your entire system ...
You will then be asked for a location to store the *.bak file. Since Windows is extremely large, storing the *.bak file on a small disks is not feasible, as it would take several of disks to hold the file.
Instead store the file locally on your hard drive. Once the file has been created, you will be prompted to insert a disk. The software will then write a program to the disk that allow you to boot the system using the disk, and restore your system via the *.bak file.
Please remember that the backup file can be extremely large, and requires you to either place it onto a CD, DVD, or in a well protected folder or partition on your computer system.
How to restore your backup files ...
If you ever have the need to utilize the backup file, simply place the floppy disk in your drive, and turn on the computer. The system will boot from the disk, and ask for the location of the *.bak file. Once you provide the system with the location of the backup file, your system will begin to replace your corrupt system files with your backup files.
How to configure an email client to use your account...
The University Computing Services (UCS) website list the settings for the following Email Applications:
- Apple Mail
- Entourage
- Eudora
- Mozilla Mail / Netscape Mail / Thunderbird
- Mulberry
- Outlook / Outlook Express
- Pine / PC-Pine
- Windows Mail (Vista)
How to stop Spam or Junk mail ...
The overwhelming amount of spam on the Internet is set to increase exponentially over the next few weeks, with users already facing serious security threats and being exposed to objectionable content and product scams bombarding your inboxes especially this time of the year.
There are ten thousands spam out there and I can’t send out an email regarding each one, warning you NOT to open it. There are all kinds of email annoyances:
- Internet hoaxes and chain letters
- Pyramid schemes and frauds
- Viruses
- And Spam or Junk mail
Unfortunately, many of us now spend so much time filtering and deleting spam that our biggest concern has become that we not lose messages we really want. Filtering alone can not get rid of Spam and even one well known filter that the University here is using (SpamAssasin) only reduce the amount of spam by 60%, the cure has become as bad as the disease.
Please follow the below tips to reduce spam and some other email annoyances:
- Before opening it, immediately delete any mail with a suspicious subject title, or from an address you don't recognise
- Be very careful when opening attachments – they can contain viruses that activate the moment you open them
- Make sure that your VirusScan is install and up to date
- Install a spam filter, or subscribe to one.
- Consider having another email address to use when giving your email address to people you don't know
- If an email asks for confidential information about your bank or credit card company, check by phone if the request is real - genuine enquiries of this kind are very unusual
- If you send emails to a large number of addresses, use the BC field (blind copy) - it means addresses are not visible to others
- Be careful when revealing your email address or telephone number on the internet, for example in chat rooms.
- Don't buy, don't reply! Never respond to spam or buy any product advertised
- do not try to unsubscribe from a spam email - if you do, the spammer will know that your email address is still valid and you will probably get more spam mails
- Do not react to false virus reports. These reports tell you how to take measures against a so-called virus. In reality there is no virus, but following the instructions may damage your computer
- Don't give away confidential personal details. Be very cautious in giving away confidential information via email or on the internet.
How to download Flash videos from YouTube style websites...
The easiest way to download videos from websites such as YouTube or Google Video is to use 4k Video Downloader.
How to download and install VLC Media Player & Perian plug-in.
To download VLC Media Player go to https://www.videolan.org/vlc/ and find the link to your Operating System.
How to convert movie files...
You can use an online tool called media-convert to convert all kinds of Movie / Text / Data / Sound and Image files. To convert your files go to http://media-convert.com/ and do the following:
- In the File text area either type the path to the file you wish to convert or click 'Browse...' and locate the required file. Media-convert should automatically detect the type of file you have uploaded but it is wise to check it has selected the correct Input Format in the field next to the File field.
- Choose the Output Format from the drop down menu then click 'OK'
- Media-convert will then convert you file, please wait while as this could take a few minutes depending on the size of file you upload.
- When Media-convert has finished converting you file the website will direct you to download the converted file, click on the link.
- Choose where to download to.
There are a number of free on-line media converters such as:http://www.moyeaswf.com/swf_to_video/?gclid=CMP2-4PslboCFU_MtAodiTUArA
Also you can convert YouTube videos directly by entering the link of your video using this web site http://www.vconversion.com/
Backing up your bookmarks is quite easy and you can easily do it by yourself without the need for any external tools. Your bookmarks may contain lots of important links which you may have collected over time and losing them could undo quite a lot of work.
To be on the safer side remember to always keep a backup of your bookmarks, better safe than to be sorry.
Internet Explorer:
As for saving your favorites, there are several options. Depending on your version of Microsoft Internet Explorer, one might work where another one won't. For the newer versions, you can export them directly from within MSIE:
- Select File -> Import and Export. This will start the "Import and Export" wizard.
- Select Export and the click on "next."
- Select Favorites and click on "next."
- In the next window you can accept the default Save Directory or choose a new one. I suggest you select "Desktop" so you can easily find the file again. Click on "next."
- Finally, click on "finish" and your Favorites will be saved to disk.
The default file name is "bookmark.htm": simply copy this file to a USB disk or even email it to yourself (or both).
To Import your Favorites into a newly created version of Microsoft Internet Explorer simply run the wizard again. This time select Import and click on "next." Browse to the saved copy of "bookmark.htm" and the wizard will replace your existing bookmarks (which are just the defaults) with the saved copy.
If you're feeling like experimenting, another option is to save your bookmarks somewhere online. There are tons of online bookmark services -- just Google "online bookmark manager". With the online option, your bookmarks aren't stored on your computer, so if it crashes you won't lose them. You do have to visit the site of your online bookmarks to get to them, but it is convenient in that you can access them from any computer with Internet access.
Here are a few of the most popular, though I can't say which are better because I do use only one of them myself:
- Pluck Web Edition
- Hyperlinkomatic
- My Yahoo (sign up for a My Yahoo account and add the bookmarks feature to your page)
- del.icio.us
Firefox:
You can also export your bookmarks with Bookmarks Manager.
NOTE *** You must be logged into an administrative account to change network settings.
- Step 1
Open up a Firefox window.
- Step 2
Click on the "Bookmarks" menu and select "Manage Bookmarks..." In case of Firefox 3.6.2 select "Organize Bookmarks..."
- Step 3
Click on the "File" menu and select "Export" in the window that pops up. In case of Firefox 3.6.2, click on "Import and Backup." Select "Export HTML." A save option will appear.
- Step 4
Give your bookmarks whatever title you like and choose a location to save them in the save window that comes up.
- Step 5
Open this file on any computer with a Web browser and click on the links to go to each bookmark, now that your bookmarks are saved as an HTML file. You can also import them into the bookmarks or favorites menu of another computer.
By default Firefox backups your bookmarks automatically when it is closed to C:\Documents and Settings\[your username]\Application Data\Mozilla\Firefox\Profiles\[profile name]\bookmarks.bak. To restore, just rename to bookmarks.html.
Backup Your Bookmarks with an Add-on:
There are many extensions for Firefox that will help you backup too. My personal favorite is Foxmarks, which comes with the additional feature of syncing them with another PC (another good backup technique in its own right). Here are the best:
- FEBE – The perfect add-on for those backing up and don’t wish to rely on other services.
- Foxmarks – The greatest backup and syncing extension out there today.
- Delicious Bookmarks – Yes, syncing with services like Delicious is another great way to backup your bookmarks.
Safari:
To backup bookmarks in Safari, select the Export bookmarks option from the File menu.
Once you have clicked on the option you should see a file save dialog allowing you asking you for the location to save the bookmarks. Choose the location you want to save your bookmarks in and click on the Save button.
You can use the Import Bookmarks option in Safari to re-import the bookmarks once again.
Opera:
To backup your bookmarks in Opera browser, click on the Manage Bookmarks option in the Bookmarks menu.
A new tab will be opened showing you the bookmarks in Opera. In the new window from the File menu select Export as HTML or Export Opera Bookmarks option.
A new save dialog should be shown to you from where you can save the file and use it to restore your bookmarks at a later date.
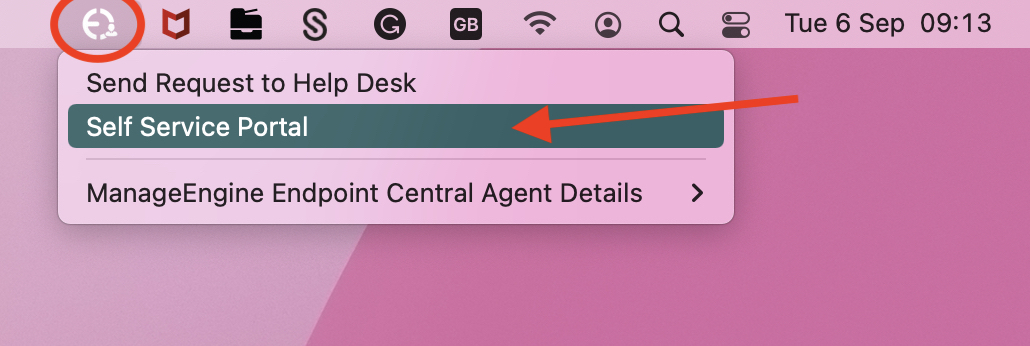
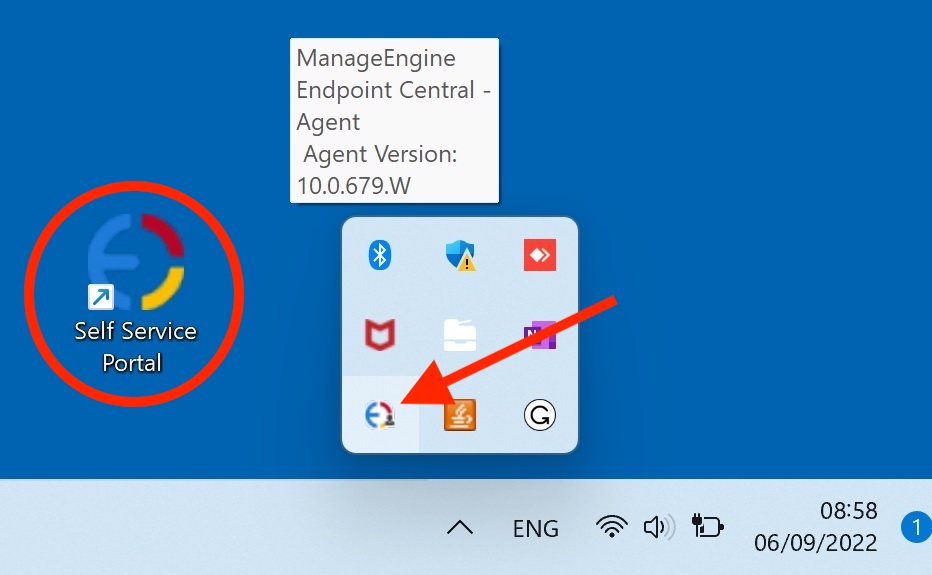
In order to install some software without the need for admin privilege use the provided "Self-Service Portal" installed on your machine.
The Self-service portal icon defaulted in the macOS menu bar (top right corner), select "Self-service portal" & choose the relevant software for installation or update.
The Self-service portal defaulted on the desktop or hidden in the notification area to the left of the clock (bottom right corner), select "Self-service portal" & choose the relevant software for installation or update.
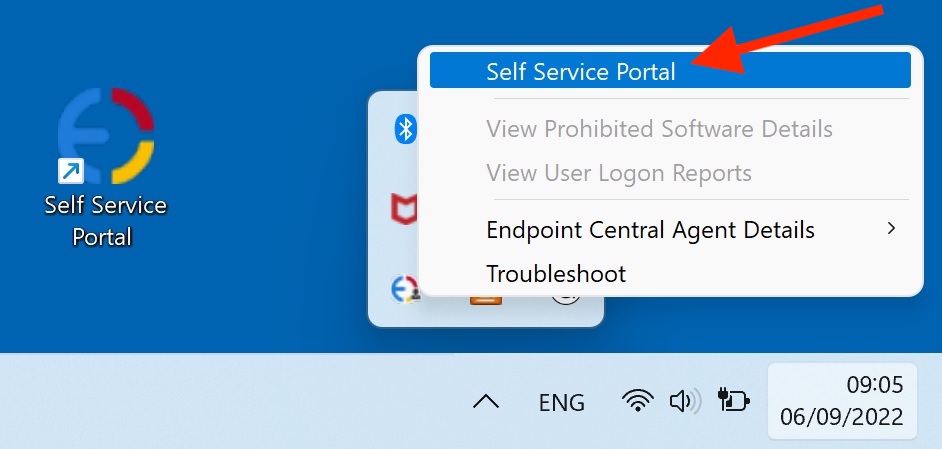

If the machine doesn't have the icon, please contact IT staff to install it on your machine. Please be reminded that do not restart the PC until the installation is finished.
Note: If you can't connect to a network drive or folder, the computer you're trying to connect from might not be connected to Pharm Domain or connected to VPN or Wi-Fi, or you might not have the correct permissions.Make sure you are connected to Pharm Domain. Try contacting the IT team for any help or information at ithelpdesk@phar.cam.ac.uk
PHARM Domain login:
The Department has a Domain called “PHARM” If you never used the Department’ Domain contact IT to request details of your credential.
You will need to use any Windows PC connected to our network to login first time to the “PHARM” domain and you will be forced to change the password you have been given.
Note: The password must be strong - 12 or over characters long and contains at least one capital letter, one number, and one symbol.
Mac OS users: Step-by-step:
From the Finder menu bar, click Go and select Connect to Server
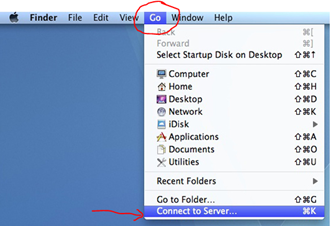
In the Server Address box, type the path for the shared folder using this pattern: For example:
smb: //mrctox/shares/Ops/operations
Note: be sure to include smb: prior to the server name and use the full server name if necessary
Note: use forward slashes / (rather than \ as on Windows machines)
You may want to add it to the “Favourite Servers” by clicking on the + sign bottom-left
Note: Lookup at Table 1 page 1 for your specific share name.
Click Connect and depending on the version of your Mac and how it is setup you may get this:
Or you’ll be prompted to enter name and password, select Connect As Registered User and enter your CRSid (some users still using their Uni account for Name and your PHARM Domain password for Password, and then click Connect
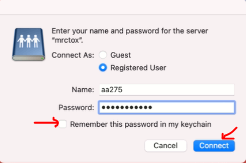
Tick the box if you want your password to be remembered
To make the folder easier to access, drag and drop the folder to the “Favourites” section on the left side of the finder window
Windows OS users: Step-by-Step:
First check what mapped drives have you got already on your “This PC” under “Network locations”
Map a network drive to get to it from File Explorer in Windows without having to look for it or type its network address each time.
From the Start menu type the full network share path: for example:
\\nameof directory\shares name\
Note: Lookup at Table 1 page 1 for your specific share name.
Or
Open File Explorer from the taskbar or the Start menu, or press the Windows logo key + E.
Select This PC from the left pane. Then, on the Computer tab, select Map network drive

In the Drive list, select a drive letter. (Any available letter will do – some users have multiple mapped drives.)
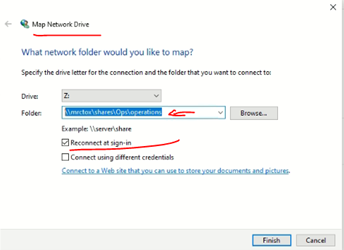
In the Folder box, type the path of the folder. To connect every time you log on to your PC, select the Reconnect at the sign-in check box and select Finish.
Note: If you can't connect to a network drive or folder, the computer you're trying to connect from might not be connected to PHARM Domain or connected to VPN or Wi-Fi, or you might not have the correct permissions. Make sure you are connected to PHARM Domain. Try contacting the IT team for any help or information at ithelpdesk@phar.cam.ac.uk
Personal admin files
OneDrive (5TB, free)
Dropbox (unlimited, £84/yr)
Group/shared admin files
Teams or Sharepoint (unlimited, free)
Google Sheets/Docs/Drive (20GB, free)
UIS Institutional File Store (depts have limited free quotas, then £150/TB/yr)
Small (<2TB) active research data that you need to access frequently, desktop-mounted
UIS Institutional File Store (depts have limited free quotas, then £150/TB/yr)
Large active research data (with good safety and resilience/protection)
UIS Research File Share (unlimited, £116/TB/yr)
Large active research data for HPC processing (without resilience/protection)
UIS Research Data Store (unlimited, £54/TB/yr)
Must also be stored safely somewhere else
Inactive data required to support/defend published work
Publish in the university’s data repository (Apollo)
Publish in a discipline-specific repository (e.g. GEO, WormBase, CCDC)
Publish in a cross-discipline repository (e.g. Figshare, OSF, Zenodo)
These resources are normally free, but may be subject to dataset size limits
Inactive data relating to completed work, must be kept, but not required to support a publication
Archive in UIS Research Cold Store (unlimited, £30/TB/yr)
Sensitive data (contains identifiable and clinically-sensitive personal information)
UIS Category 3 Secure Storage (contact your dept IT staff for more info)
I can’t afford to store my research data as recommended above
Research data management must be properly resourced, for scientific, compliance and reputational reasons. Storing unique research data on unmanaged, non-resilient systems is not appropriate.
Try to identify duplicates of files, versions that are no longer required, temporary files etc that can be deleted, and inactive data that can be archived onto Research Cold Store, to reduce costs.
If you still have insufficient resources, discuss with your PI, or your HoD
My group/department has its own data storage system
To reduce costs, carbon footprint, contracts, complexity and fragmentation, the university discourages proliferation of local storage systems - UIS storage offers high quality, performance and security, and should be the default choice.
If local high-volume storage systems are required (e.g. for high-output scientific equipment and processes), they must be located in suitable accommodation with appropriate power and cooling, and high levels of availability, security and resilience:
Mirrored, backed-up, UPS-protected, monitored and maintained, never more than 7yrs old
Stuff that’s on my computer
Never keep unique research data on your computer's internal HD
Use OneDrive
And use strong passwords and consider encrypting your disk
And back up your computer daily to an external HD (at least 2x capacity of your computer HD)
And avoid routinely carrying your laptop and its backup HD together in the same bag
Help and further information
Your departmental IT staff
Cambridge Data Champions
SBS IT Office (it@bio.cam.ac.uk)
UIS Service Desk (servicedesk@uis.cam.ac.uk)
University Library Office of Scholarly Communication
Update your package lists:
sudo apt-get update
Install ClamAV:
sudo apt-get install clamav clamav-daemon -y
After you finish the installation, ensure your ClamAV virus signatures are up to date.
Stop the ClamAV process:
sudo systemctl stop clamav-freshclam
Manually update the ClamAV signature database:
sudo freshclam
Restart the service to update the database in the background:
sudo systemctl start clamav-freshclam
Below are the most common options for using ClamAV clamscan in the terminal.
Scan all files, starting from the current directory:
clamscan -r /
Scan files but only show infected files:
clamscan -r -i /path-to-folder
Scan files but don’t show OK files:
clamscan -r -o /path-to-folder
Scan files and send results of infected files to a results file:
clamscan -r /path-to-folder | grep FOUND >> /path-folder/file.txt
Scan files and move infected files to a different directory:
clamscan -r --move=/path-to-folder /path-to-quarantine-folder
There are two types of VPN:
1- The University wide VPN or UIS VPN: https://help.uis.cam.ac.uk/service/network-services/remote-access/uis-vpn
2- Institutions managed VPN that provides access to resources restricted to their own networks. The Pharmacology VPN is: "vpn.phar.cam.ac.uk"
You can access the department VPN same way as you do with the UIS VPN and same installation steps. Make sure you create a separate token for this https://tokens.uis.cam.ac.uk/
Windows installation steps: https://help.uis.cam.ac.uk/service/network-services/remote-access/uis-vpn/windows10
MacOS steps: https://help.uis.cam.ac.uk/service/network-services/remote-access/uis-vpn/macos
Technical/generic information: https://help.uis.cam.ac.uk/service/network-services/remote-access/uis-vpn/generic
Certificate and Apple profile can be obtained here if needed - scroll to the Pharmacology: https://help.uis.cam.ac.uk/service/network-services/remote-access/uis-vpn/managed-list
Troubelshooting:
'809' errors:
'809' errors can be caused by antivirus programs, the firewall on a device, the customer's router settings or bandwidth measuring apps. Temporarily disabling the antivirus settings,
firewall and bandwidth measurer and then making a connection will, hopefully, allow the VPN to connect. Once it has, the programs can be re-enabled. If the customer believes
that the issue is caused by their router they should speak with their ISP to find out if VPN access is blocked by default.
A user has reported that the UIS VPN does not work under IKEV2 on Windows 10. On connection, a 'wrong arguments' error message appears.
The following instructions from a user on github were found to resolve the issue, and may prove useful.
'wrong arguments' error message:
Clear the Networking caches
- Run windows cmd window (click windows start menu, type 'cmd', right click on 'Command Prompt' and select "Run as Administrator").
- Type the command: netsh int ip reset
- Then type: netsh int ipv6 reset
- Then type: netsh winsock reset
- Restart your computer.
Reset Device Manager adaptors
- Open Device Manager
- Find Network Adapters
- Uninstall WAN Miniport drivers (IKEv2, IP, IPv6, etc.)
- Click Action > Scan for hardware changes
- The adapters you just uninstalled should come back.
Ubuntu error:
Users have reported that they find they're unable to access the internet while connected to the VPN on Ubuntu 18 systems.
One user discovered they fixed the issue using the following command:
sudo apt install resolvconf
You may need to reboot in order to make this work.